Showing posts with label Halloween nail art. Show all posts

Sunday, December 20, 2015

Stamped red dripping on nude nail art

Hi, For some strange reason this got stuck in my archive even though it was posted in IG for some time ago. It was part of a twin mani I did with Lakobotan. Basically a nude base with red dripping stamping on top. :) Not the most Christmas like mani, but still wanted to publish. :)


Rival de Loop - 502
Moyou special red nail polish
Bornpretty Stamping plate BP29 (item no 17912) (Bought from bornprettystore sale previously)

Don't forget my 10% discount code: NGL91 :D

Sunday, November 1, 2015

NCC presents: Halloween Funky french with leo spots

As you know I'm behind at the nail challenge collaborative for October but I'll just push my posts out anyhow. Today I'll show you my second funky french which has purple funky french base and then some cheeta spots half way, the original design isn't mine, this is one I've seen several times before. I've done this kinda mani before [HERE] too, but this time it has a slight more halloween feel to it, even though it doesn't have to be that. ;)


Polishes used:
KIKO - 333
KIKO - 822
R de L Young - Mystic Black
Essence - Have Fun (used this one as a base for the orange spots because the orange KIKO was a bit sheer)


Post 2

Sunday, November 3, 2013

Halloween spider funky french

The theme is free at Lelack's Nail Art Sunday this week which fits perfect for the last day of my own Halloween theme week. Today I'm showing you a spider web funky french with accent nail art with 3D spider nail art. I love the colors and pretty much everything about this. It's also a re-design of a nail art I've done for my self for at least three years in a row now and which you can see below;

This is last year's version,
click image to get to the original post.
This year I decided to make a funky french version of it and as I said, I really love this version. I think the gradient was a bit better last year, I prefer using shimmer for that but this year I used a creme and they usually wont blend as well as sheerer polishes. I hope you like this even though the the photos aren't the best, I also prefer photographing my nails directly after I've painted them or at least within two days. Here this is the forth day and there's some tip wear and some wear and tear, it's also something as unusual as a NOTD and not archive pics this time! ;)


Right and left hand.

Polises used:
Nordic Cap - NP13
Kleancolor - Mango
Jordana Pop Art - Black Mark
4MM black opaque rhinestones

Saturday, November 2, 2013

Pumpkin funky french - comparison

And, just for fun.. A post with both the matte and shiny version. Somehow I find the shiny version more vibrant in the colors so maybe I prefer that one more, then again matte is really cool. Which one do you prefer?

http://gelicnailart.blogspot.se/2013/11/halloween-pumpkin-funky-french-shiny.htmlhttp://gelicnailart.blogspot.se/2013/11/halloween-pumpkin-funky-french-matte.html

I'd also like to show you last year's pumpkin funky french I did. I'd definitely say that there has been a major improvement in just one year, both skills and technique but also taking photos, cleanup, placements etc.
http://gelicnailart.blogspot.se/2012/10/pumpkins-nail-art.html
To get to each post, just click the images. :)

Halloween pumpkin funky french - Matte version

As I promised, here's the matte version of the pumpkin funky french. If you click the link you can go check out the shiny version if you' already haven't seen it!


Polishes used:
HM matte top coat
Jordana Pop Art - Black Mark

Sure Promise (orange)
Kleancolor - Mango
China Glaze - Sensuous
Nordic Cap - NP12

Halloween pumpkin funky french - Shiny version

Hi! Hope you're all having a lovely weekend, today me and my bf are visiting my parents up north, hence the late post. Today I'm showing a nail art I actually did in the beginning of this week and I'm so content with it. I loved wearing it and I wore it both shiny and matte, here I'm showing the shiny version. The reason why I'm not showing both simultaneously is that I simply couldn't chose which photos to remove and it would have been such a long post otherwise..lol Later I'll soon post the matte version. Hope you'll like it as much as I! :)


Polishes used:
Jordana Pop Art - Black Mark

Sure Promise (orange)
Kleancolor - Mango
China Glaze - Sensuous
Nordic Cap - NP12

Friday, November 1, 2013

Halloween devil fimo nail art on holo background

Hi, hope you all will have a great Friday! I feel very happy today because my brother visited me yesterday, we ate pizza and talked about stuff in general. I don't see him that often since we live far from each other but now he was close by since of work. Another nice thing is that me and my bf are going to visit my parents this weekend. Something more blog related is that I feel like such a bad blogger at the moment, I have only had a limited time for reading and commenting other people's blogs and even answer comments on my own blog. I feel lucky that I've been some days ahead with the halloween theme, otherwise it would have been impossible. First I was going to show you another nail art but then I realized that I'm actually are wearing a holo nail art at the moment and since it's Holo Friday at Skimmerskuggan I changed my plans and decided to show that one instead.

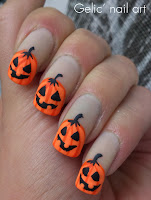
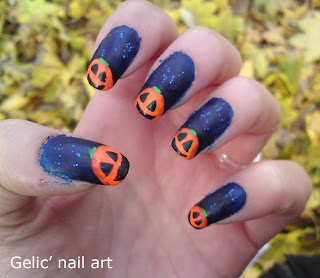
When I started with this I had some other plans and started of by making a gray gradient. The gradient turned out a bit bleh..so I decided to use a gray holographic polish on top and then use some devil's like fimos (I think they're devils at least?) as decoration. This time I decided to have the fimos on all nails. I actually liked the result quite more than I first thought. Oh, and btw, I want to excuse in advance, the photos are mostly taken under a lamp so they aren't the best...


Polishes used:
China Glaze - Pelican Gray
Nordic Cap - NP24
Gabrini Elegant - 338
Catherine Arley - 667

Thursday, October 31, 2013

Halloween glitter gradient

Hi, as you might know I having a Halloween theme week and today I'm showing a Halloween gradient, or that's at least what I call it. I was thinking about "Halloween colors", and the orange and black combination are given, I've also seen a lot of green and purple. So basically I decided to have a purple base and then used Spooky Floam (which I showed earlier) to make a inverted glitter gradient. I think the result came out really cool, not overly "Halloween like", more elegant but still with some classical Halloween colors. Hope you like it!


Added a close up to show how the orange glitter really pop! And yea, btw everything which was "floamed" here glowed in the dark! ;) Not too bad.
Polises used:
Rapsodi (purple)
Ninja Polish - Spooky Floam